|
CLASS 3 : Web pages as containers: HTML links, images, audio
and video
PATHNAMES
Web pages can be comprised of textual content, or can contain —
point to — multimedia content as well. To insert graphic, audio
and video files, and even to provide hypertext links, you have to tell
the browser where to look to find the file. This is done by specifying
a path, in UNIX syntax. Paths can be specified in two different schemes:
absolute and relative.
Absolute paths
A complete URL, specifying the protocol, the domain name, as well
as the directory path to a specific file, is called an absolute path.
(See Anatomy of a URL from Class 1.)
Relative paths
An abbreviated URL, specifying just the path to the linked file
relative to the location of the current file, is called a relative
path. You can think of relative paths as just the tail-end of an absolute
path (i.e., just the directory path and file name minus the protocol
and domain name).
Relative paths are more efficient than absolute paths in accessing a
server. They also have the advantage of making your documents more
"portable" — for instance, you can create several Web pages in a
single folder on your local computer, using relative links to hyperlink
one page to another, and then upload the entire folder of Web pages to
your Web server. The pages on the server will then link to other pages
on the server, and the copies on your hard drive will still point to the
other pages stored there.
UNIX syntax
Pathnames use the standard UNIX syntax. Forward slashes indicate
movement down through nested directories, while double periods ("..")
indicate movement up.
I'm building my roadtrip Web pages here within the course Web site
(www.artic.edu/~kreute/web1/) with this directory structure:
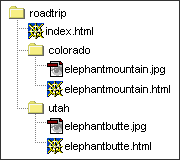
So, an absolute path to top page of the site would look like this:
http://www.artic.edu/~kreute/web1/roadtrip/index.html
A relative path from the top page of my roadtrip site to the Elephant
Mountain page would look like this:
colorado/elephantmountain.html
A relative path from the Elephant Mountain page to the Elephant Butte
page would look like this:
../utah/elephantbutte.html
You can see how this looks in action, by visiting this
Roadtrip
site. Try clicking on the links and viewing the source code to
see how the images and links are pathed.
It is important to point out that UNIX is a case-sensitive operating
system where filenames are concerned, while DOS and the MacOS are not.
For instance, on a Macintosh, "INDEX.HTML", "Index.HTML", and
"index.html" are all the same name. If you make a relative hyperlink
to "INDEX.HTML", and the file is actually named "index.html", the
link will still be valid. But if you upload all your pages to a UNIX
Web server, the link will no longer work. Be sure to check your
filenames before uploading.
In addition, while MacOS and DOS will allow you to use spaces in your
file names, UNIX will not.
LINKS & ANCHORS
The chief power of HTML comes from its ability to link text and/or an
image to another document or section of a document. A browser highlights
the identified text or image with color and/or underlines to indicate
that it is a hypertext link (often shortened to hyperlink or just link).
Anchors can also be used to move a reader to a particular section in a
document (either the same or a different document) rather than to the
top, which is the default.
<A>...</A>
Definition: The A tag lets you define anchors and links. An
anchor defines a place in a document. A link displays a hypertext
link that the user can click to display an anchor or a document.
Attributes:
HREF="location"
"Hypertext reference": Creates a link and specifies a destination
URL. The most common value here is a document name or an anchor.
To specify a document to open, provide the URL for the document,
either as an absolute or relative URL.
[display]
NAME="text"
An anchor identifies a place in an HTML document.
[display]
IMAGES
Most Web browsers can display inline images (that is, images next to
text) that are GIF, JPEG, or BITMAP format. Each image takes additional
time to download and slows down the initial display of a document.
Carefully select your images and the number of images in a document.
<IMG>
Definition: Specifies an image to be displayed in an HTML
document.
[display]
Attributes:
SRC="location"
Specifies the URL of the image to be displayed in the document.
The syntax for <IMG SRC> URLs is identical to that used in an
anchor HREF. If the image file is a GIF file, then the filename
part of the path must end with .gif, JPEG image files must end
with .jpg or .jpeg, and BITMAPS must end with .bmp.
WIDTH="#|%"
Specifies the width of the image either in pixels or as a
percentage of the window, frame, or positioned block of HTML
containing the image. To indicate a number of pixels, specify the
value as an integer, for example, "100". To indicate a
percentage, specify the value as an integer followed by the
percentage sign, for example, "20%". If not specified, the
image is displayed at its actual width.
Note:
Although the WIDTH (and HEIGHT) attribute is not required,
it is recommended that it always be included. Specifying
the dimension of your images speeds download and will render
your page properly even if the image does not display
(because the user has turned images off, or because the image
cannot be found).
HEIGHT="#|%"
Specifies the height of the image, either in pixels or as a
percentage of the height of the window, frame, or positioned
block of HTML that contains the image. To indicate a number of
pixels, specify the value as an integer, for example, "100". To
indicate a percentage, specify the value as an integer followed
by the percentage sign, for example "20%". If not specified, the
image is displayed at its actual height.
Note:
Although the HEIGHT (and WIDTH) attribute is not required,
it is recommended that it always be included. Specifying
the dimension of your images speeds download and will render
your page properly even if the image does not display
(because the user has turned images off, or because the image
cannot be found).
ALIGN="left|right|top|absmiddle|absbottom|texttop|middle|bottom|baseline"
Creates an "inline" image, by specifyng the alignment of
the image in relation to the surrounding text:
- LEFT aligns an image with the left margin and
text wraps to the right.
- RIGHT aligns an image with the right margin and
text wraps to the left.
- TOP aligns the top of an image with the top of the tallest
item in the current line.
- ABSMIDDLE aligns the middle of an image with the middle
of the text in the current line.
- ABSBOTTOM aligns the bottom of an image with the bottom of
the lowest item in the current line.
- TEXTTOP aligns the top of an image with the top of the
tallest text in the current line.
- MIDDLE aligns the middle of the image with the baseline
of the text in the current line.
- BOTTOM is the same as BASELINE.
By default, an image starts on a new line and is aligned with
the following text.
HSPACE="#"
"Horizontal space": specifies a margin in pixels between the
left and right edges of the image and surrounding text and
images. Give the value as an integer. The default is 2 pixels.
VSPACE="#"
"Vertical space": specifies a margin in pixels between the top
and bottom edges of the image and surrounding text and images.
Give the value as an integer. The default is 2 pixels.
BORDER="#"
Specifies the width, in pixels, of a border around the image.
The value must be an integer. If not specified, the image
displays with no border, unless the image is hyperlinked and
then default border is 2 pixels. The color of the border will be
the color of the text (or the link, if hyperlinked) as specified
in the <BODY> element.
ALT="text"
Specifies text to be displayed if the browser does not support
the IMG tag or if the user has suspended image loading in the
browser. Some World Wide Web browsers — primarily the text-only
browsers such as Lynx — cannot display images. Some users turn
off image loading even if their software can display images
(especially if they are using a modem or have a slow connection).
HTML provides a mechanism to tell readers what they are missing
on your pages if they can't load images.
AUDIO & VIDEO
Audio and video are displayed in Web browsers via a plug-in, which is a
separate application that has been "plugged in" to the browser, so that
it acts as an extension. When loaded, an embedded plug-in is displayed
as part of the HTML document in a rectangular region of the page. This
is similar to the way a GIF or JPEG image is embedded, except that the
plug-in can be live and respond to user events, such as mouse clicks.
Users must have the appropriate plug-in installed in their browsers
before they can see the results of running an embedded file that uses a
plug-in. If a user opens a Web document that uses an EMBED tag, and the
plug-in needed by the EMBED tag is already installed, the results of
running the embedded file are displayed automatically.
If a user tries to open a Web page that loads an uninstalled plug-in,
the browser asks if the user wants to to install the plug-in. If the user
ignores the prompt to load the plug-in, the browser displays a puzzle
piece in the space reserved for the embedded file. The user can click on
this at any time to get the Plug-in Finder page. This page takes the MIME
type and file extension for the plug-in and tries to match it to
available MIME handlers on the Web site.
<EMBED>
Definition: Used for embedding alternative elements such as
movie, sound, and more. The correct plug-in must be installed. EMBED
attributes are different between each plug-in.
[display]
For audio and video,
the QuickTime plug-in is very common — the following attributes
are the most useful:
Attributes:
SRC="location"
Indicates the location of the file by its URL. The syntax for
<EMBED SRC> URLs is identical to that used in an anchor
HREF. If the audio file is a AIFF, WAV, MIDI, MOV, AVI, MOV or MPG
file, then the filename part of the path must end with .aiff,
.wav, .midi, .mov, .avi or .mpg, respectively.
WIDTH="#"
Specifies the width in pixels of the embedded file. Required
for any standard QuickTime embedding.
HEIGHT="#"
Specifies the height in pixels of the embedded file.
Required for any standard QuickTime embedding. If you would
like to have the QuickTime "controller" on your file (see
below), then add 16.
CONTROLLER="true|false"
Sets the visibility of the file controller, with the pause/play
buttons and volume controls. A value of TRUE displays the
controller; FALSE suppresses the controller. The default is
TRUE. (Note: requires QuickTime 3 or later.)
AUTOPLAY="true|false"
Determines whether the file will begin playing automatically.
A value of TRUE begins the file automatically; FALSE requires
the user to press the play button to begin the file. The default
is FALSE. (Note: requires QuickTime 3 or later.)
LOOP="true|false|palindrome"
Sets whether the file will play continuously. A value of TRUE
means the file will play continuously; FALSE will play the file
once and then stop; PALINDROME causes the movie to play
alternately forwards and backwards. The default is FALSE.
(Note: requires QuickTime 3 or later.)
HIDDEN
Controls the visibility of the file. If you supply HIDDEN, the
movie is not visible on the page. If you do not supply HIDDEN,
then the movie will be visible. Appropriate for audio-only files
which are hidden in the background. If you use the HIDDEN
attribute, be sure to set AUTOPLAY="true" as well. There are no
values to supply for this attribute. (Note: requires QuickTime
3 or later.)
PLUGINSPAGE="url"
Allows you to specify a URL from which the user can fetch the
necessary plug-in if it is not installed. If your browser cannot
find the plug-in when loading your page, it will warn the user
and allow them to bring up the specified URL, from which one
could download the required plug-in. For QuickTime, set this
attribute to: "http://www.apple.com/quicktime/download/" which
will point to the latest version of the plug-in.
SKILL MASTERY
Pathnames
- Practice writing the pathnames for files, paying close attention
to use proper UNIX syntax.
Links & Anchors
- Create links to some of your favorite Web sites, using absolute
pathnames.
- Create two HTML documents and link them together, using relative
pathnames.
- Create an HTML document with a number of anchors and create
links to those spots.
Images
- Practice inserting an image into your HTML document.
- Experiment with sizing your image, using values in pixels
as well as in percents.
- Create a linked image.
- Practice changing the alignment of your image with text.
- Change the horizontal and vertical spacing on your image.
- Turn images off in your browser's Preferences settings and check
out how your ALT text displays.
Audio & Video
- Embed an audio and/or video file in your HTML document.
- Try adding a controller to your audio and/or video file —
be sure to change the height setting accordingly.
- Try setting your audio and/or video file to autoplay.
- Try setting your audio and/or video file to loop.
- Try hiding your audio file — be sure to set your file
to autoplay.
FURTHER READING
Pathnames
Links & Anchors
Images
Audio & Video
NEXT CLASS
Positioning content on your Web pages
HTML tables
|